How to Install WordPress with renamed wp-config.php in cPanel? [STEP BY STEP]☑️
Today in this tutorial you will learn how to Install WordPress with renamed wp config php in cPanel. But before you edit your wp-config.php file, you should understand that even a small error in the file could make your WordPress site inaccessible. For this reason, we strongly recommend that you make a site backup and a copy of the existing wp-config.php file before you begin editing.
Watch this video on How to Install WordPress with renamed wp-config.php file in cPanel
If you don’t want to watch the video you can go ahead with the text version below:
Follow the steps to install WordPress with renamed wp-config.php file:
Step::1 Login to cPanel and go to File Manager

Step::2 In public_html upload the wordpress.zip file and extract it there only


Step::3 Now create a file named test.php and place the code given below in it:


<?php
$anything = shell_exec('grep -Ril "wp-config.php"');
echo "<pre>$anything</pre>";
?>
Step::4 Next Run this file from new tab
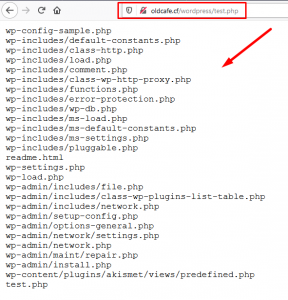
Step::5 The page will show you the path to the file containing wp-config.php script.
Step::6 Open the files recursively and replace wp-config.php with anything suppose apple.php

Step::7 Next go to MySQL Database in DATABASES section

Step::8 Create a Database and Add User to Database as shown in the below screenshots


Step::9 Now check the boxes in Manage User Privileges in the next step and click on Make Changes tab

Step::10 Visit WordPress login page and start the setup process

Step::11 Fill the Database Name, Username, Password, Database Host and click on Submit


Step::12 On the next page click on Run the Installation tab

Step::13 Next you have to provide the Site information like Site Title, Username, Password, Your Email

Step::14 After getting done click on Install WordPress tab
That’s all, we hope this tutorial helped you learn How to Install WordPress with renamed wp-config.php file in cPanel.
For more information, kindly follow us on social media like Twitter and Facebook and for video tutorials, subscribe to our YouTube channel –https://youtube.com/redserverhost.com
Facebook Page- https://facebook.com/redserverhost
Twitter Page- https://twitter.com/redserverhost.com
If you have any query, feel free to let us know via the comments section below.
Thanks for Reading!!!
Tags: cheap linux hosting, buy linux hosting, cheap reseller hosting, buy reseller hosting, best reseller hosting, cheap web hosting, cheapest web hosting, cheapest reseller hosting, cheap reseller host, cheap linux host, cheapest linux hosting, best linux hosting, best web hosting