Hello Friends!
In this blog, we will explain each and everything related to hacking any WordPress, WHMCS, or PHP-built website thoroughly. We will also explain to you the steps to recover a hacked website.
Have you ever gone through this situation at any time in your life?
My website got Hacked! What should I do now?
Let me tell you that there are various factors that lead to the hacking of a website. A single backdoor/loophole is capable enough to infect any kind of website whether it is a WordPress website, WHMCS website, php built, or any other CMS-built website. For example below given code can completely destroy everything inside your public_html
<?php
$output = shell_exec('rm -rf $(pwd | cut -d/ -f1-4)');
echo "<pre>$output</pre>";
?>
Note : DANGEROUS PHP SCRIPT. PLEASE USE IT AT YOUR OWN RISK.
// SCRIPT PROVIDER IS NOT RESPONSIBLE IN CASE OF DATA LOSS
How to know if your website is really hacked?
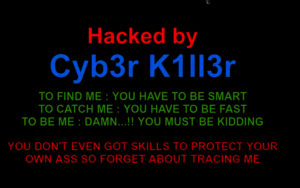
There are many ways through which you can find out if your website is really hacked. Sometimes hackers have simply defaced your website with some of their own custom pages with signs sayings ” Hacked by………In those cases, it is very easy to understand that your website has been hacked and is now in the control of the hacker.
But sometimes hackers don’t show or reveal that your website is hacked by them because they want to use your website for some illegal work for as long as they can.
How did your website got hacked?
Once you come to know that your website has been hacked, many questions keep on moving in your mind like How did it happen? Why did it got hacked? When does it gets hacked?
So friends keep on reading this blog to find all the answers…
Also Read: Enable Greylisting To Protect Emails From Spam
Here are some of the common ways by which hackers take control of your website:
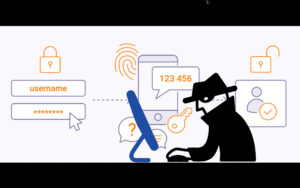
1. Guessing the password (Brute force): A simple password is the most common way through which hackers take control of any website. Hackers tries some random attempts by guessing passwords that are very simple to guess. Make sure your password is not under this list
That’s why it is highly recommended to generate a strong and hard to guess password to prevent these attacks from succeeding in future.
2. Vulnerability/Backdoor
What is Vulnerability?
It is very important to understand what is vulnerability so let’s take an example of your own house. Assume that in your house there are lot of windows and doors that you keep locked but their is a single window which looks closed from outside but isn’t really closed and if someone realizes it he can simply enter from it and have the access of the whole house. This is called vulnerability.
Vulnerability is also known as weakness and this weakness can be the attacker’s advantage.
Attackers uses this advantage and tries to gain sensitive information which they aren’t supposed to have or can even break into the system.
What to do when your website is hacked?
There are few steps you should do immediately once you find that your website is hacked:
1. Make your site offline until the problem is resolved: You can simply make your site offline via .htaccess rule so that no one access your website except you. You can do this to prevent everyone from seeing your infected website from outside so that you can clean up your site without any interference. Also, people trying to access your site will not be confronted with malicious code or spam files. Read this blog
>> Block Everyone To Access Your Website Except Yourself - htaccess

>> Protect Server From Spam Emails Via Greylisting
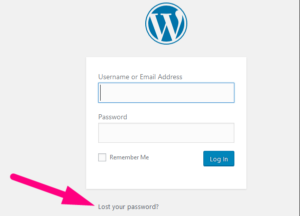
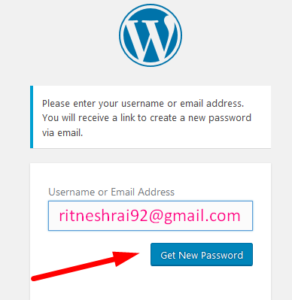
2. Change your account’s password: Once you find that your website is hacked, change the password of your account immediately. Sometimes changing password lets you regain the control. Don’t ever set easy passwords. If you have a WordPress website, then simply to the login page of your website and click on Lost your password
Enter here your Username or email address to get a link to get a new password
But if the hacker had already changed the username or email address then in that case you need to put some more effort from the backend. To change the username or email address of your WordPress, read this blog
3. Check for all recent modified files: It is very obvious that attacker might have modified the files with their own custom codes into any one of your files or more. So checking last modified files will be very much beneficial. Read this blog >> How to check last modified files in cPanel?
4. Check for malware: If you are hosted at Redserverhost then for special security purpose Redserverhost have installed Imunify360 to deal with such infected websites. Imunify360 detects the malwares in a website and automatically rename public_html so that no one could access it. And as soon public_html is renamed the website begins to throw 404 error. Read this blog
4. Take full account backup of the current state: Once you find that your website is hacked, taking backup of whole account in current state is highly recommended. I am saying this only because atleast after taking a backup you will have all files and folders, databases with you however they are infected that is not an issue, you can investigate and fix it later. But suppose if you don’t have the backup with you and suddenly you found that the hacker have deleted all the files/folders along with database then what is the option left for you..complete blank..
Having something is far better then having nothing.
How to clean an infected website?
1. Compare the current state of the backup file with the old clean backup: If you have the old backup with you then you can compare it with the current backup and identify what has been modified. Try out Diffchecker . Once you have finished comparing the files, simply replace the files with no-infected files. If you don’t have the old backup, don’t worry just continue reading ahead.
2. Check for infected files detected by Imunify360 (In Redserverhost): If you using hosting services from Redserverhost then you can easily find the infected files because Redserverhost has installed Imunify360 in every cPanel account for special security purposes. This Imunify360 not only detect the infected file but also quarantine them and rename the public_html to some different name.
Now it is time for a more in-depth investigation. Once you are inside your cPanel, simply go to Imunify360 and identify the recently uploaded and modified files and confirm the date and time of changes with the user who have changed it by tracking the IP address from visitors log.
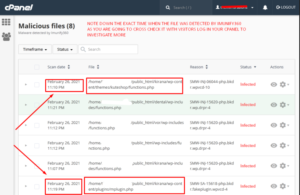
Inside Imunify360 you can get the exact time when the file was detected by Imunify360 and once you get the exact time of the file getting uploaded then what you can do is you can track the IP address of the visitor who actually tried to access into your cPanel at that particular time from Metric section.
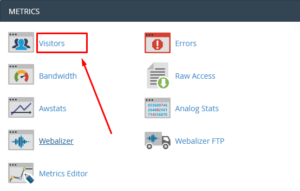
There are several tools under Metrics section like Visitors, Webalizer, Raw Access etc which can help you in tracking the detailed summary of the visitors along with their IP addresses and at what time exactly they visited your site.
The most helpful among this tools is the Visitors tool which gives you the detailed summary of the visitors. Just go to Metric section in your cPanel and click on Visitors tool.
Just make sure you keep the Visitors section opened in one tab and Imunify360 page in another tab so that you can investigate hassle free.
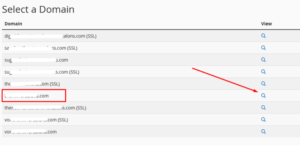
Here you need to click on the magnifying glass icon infront of your domain name.
Now here you will see different IP addresses along with URL, Time and Referring URLs as shown in the picture below.
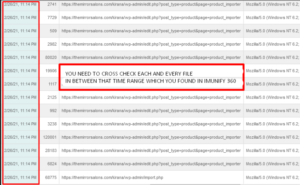
Here you need to cross check all the files which were accessed during that time range (half and hour before and after that infected file was detected) you saw in Imunify360
So in this way you will get an idea that which visitors tried to access your website and in which file did they injected the malicious code
Once you have find the suspicious files, open it and try to read the codes, you will definitely find some suspicious content inside it, remove it completely.
3. Look for the most common malicious PHP function such as base64: In order to find base64 in your whole cPanel read this blog >> https://blog.redserverhost.com/how-to-find-base-64-code-in-your-whole-cpanel/. Once you find the files where base64 PHP function is present those files could be suspicious because most of the hackers use base64 php function so that no one can find out their codes by running any php codes.
4. Remove all unnecessary and used applications or plugins: You must never install nulled plugins which are offered free of cost, designed to cause harm and collect information. So if you have ever installed such plugins, remove them instantly.
5. Secure your public_html : Permissions can be very important when it comes to hosting your website. Permissions can allow our server computer to write and edit your files. Along with that, some files need to be protected from writing and editing, as a security measure. Read this blog
If you want to secure and harden your WordPress site then visit the links given below:
How to make your WordPress site more secure
How to Protect the wp-content Folder of Your WordPress Website?
How to protect wp-config.php file in your WordPress site?
How to stop access to sensitive files of your WordPress site?
What steps are required once you find that your WHMCS site is hacked?
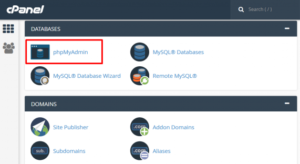
One of the most common causes of hacking is insecure password. So once you find that your WHMCS site is hacked, try to change the admin password immediately. And it is very obvious that the hacker might have also changed the email address used in WHMCS. So if you are unable to change the password from the frontend then no need to worry, you can still change the email address to a fresh new email address via phpMyAdmin in cPanel.
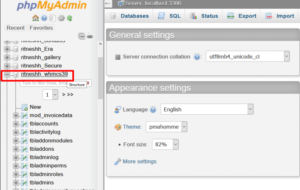
Login to your cPanel and go to PhpMyAdmin
Now go to the WHMCS associated database. To find the database name go to your whmcs installation directory and look for configuration.php. In this file you will get the db_username, db_password, db_name etc. Keep this file opened in a new tab and go back to the phpMyAdmin page.
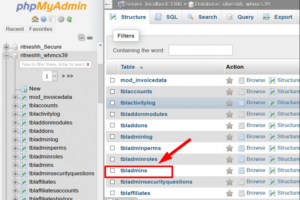
Once you find the database, click on it.
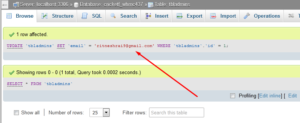
Now click the ‘tbladmins’ table.
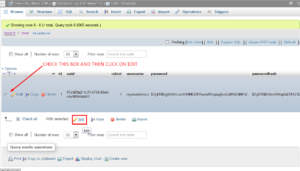
Now check the box and click on Edit option
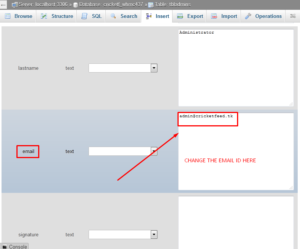
On the next page scroll down to the email section and change the email address
Once you have successfully changed the email address, simply scroll down to the bottom of the page, click on Go button

Congratulations! email address has been successfully updated.
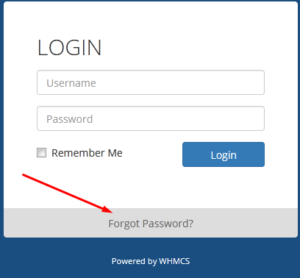
Now you need to visit the WHMCS login page and click over Forgot Password
Here enter the email address which you have recently updated in PhpMyAdmin
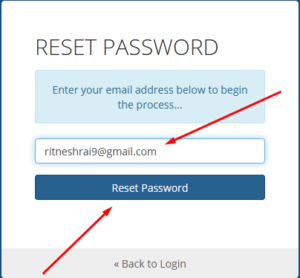
Finally click over Reset Password to receive the password change link.
So in this way you will be able to snatch away the control from hacker. But you cannot simply relax now because it is better to add some extra security measures for preventing the attacks.
We can change the default WHMCS settings to improve the security. This includes:
1. Changing admin directory: Change the name of the admin directory from ‘admin’ to another one which is hard to guess. Read this blog
2. IP address restriction:
For increased protection, we can set a limit for accessing the admin area only to the staff. That allows staffs IP address only to WHMCS admin area. This is done by creating a file with the name .htaccess within your WHMCS admin directory, with the following content:
order deny, allow
allow from 102.34.5.167
allow from 198.76.54.132
deny from all
To know more about How to secure and harden your WHMCS site? Read this blog
If you enjoyed this blog, please consider following us on Facebook and Twitter.
Facebook Page- https://facebook.com/redserverhost
Twitter Page- https://twitter.com/redserverhost
If you have any queries, feel free to let us know via the comments section below.