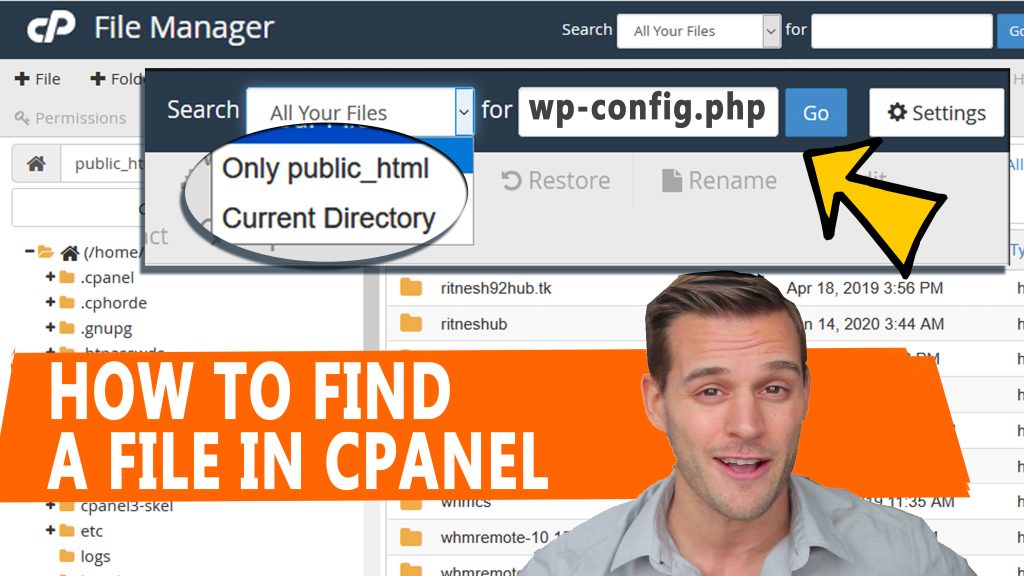
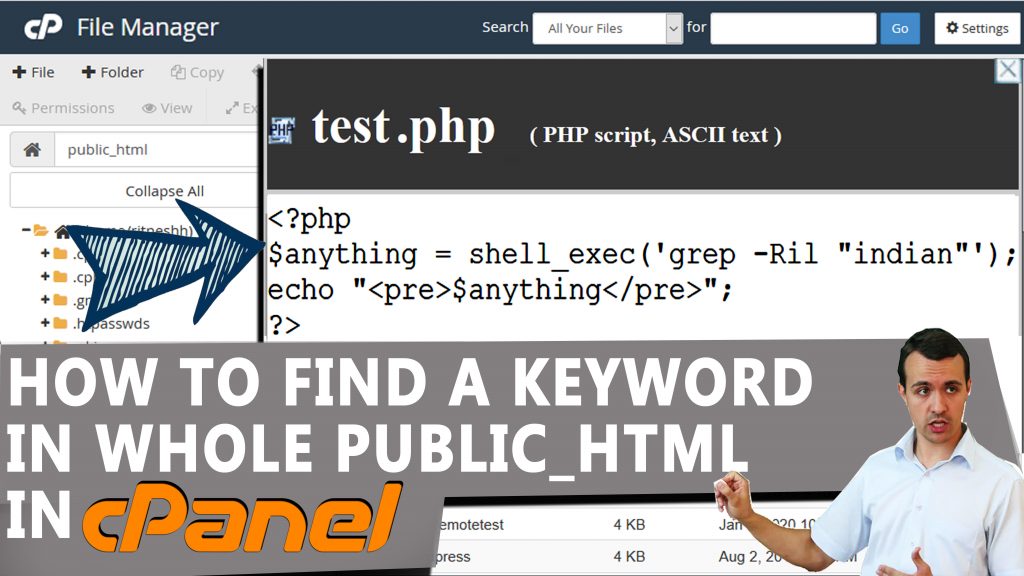
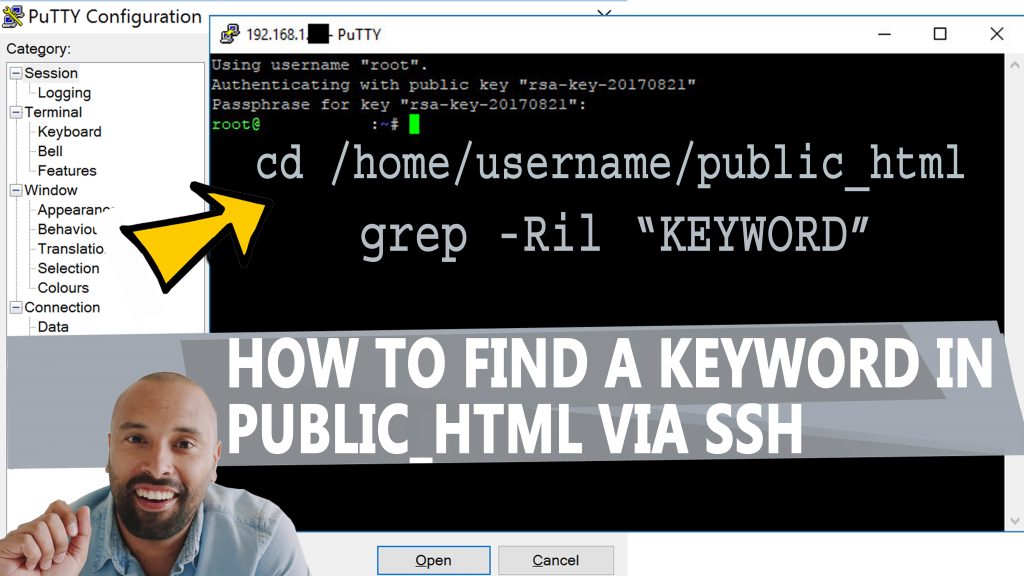
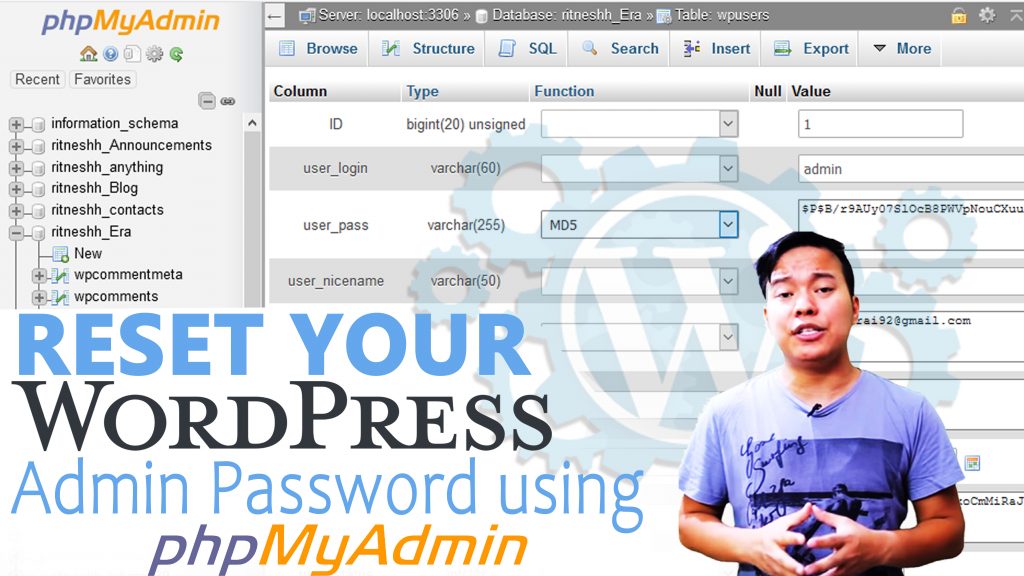
Today we will go to discuss how we can install SSL certificate in WHM account Step 1. Log into WHM account Step 2. In the screen left side navigation menu you have to click on the button SSL/TLS and here you have to generate SSL certificate and signing request Step 3. Now you will see
As we already have described that how to create sub-domain in this tutorial I am going to described how we can see the list of subdomain in WHM account. Step 1. Log into WHM account Step 2. Click ont the link Account Iinformation which will located oon the home screen Step 3. You will able
Here with the help of these set up you can upgrade/downgrade your cPanel packages, for example, you a created package and you gave facility to host 1 website after some time you want to offer hosts 5 websites then you need to upgrade your package. Step 1. Log into WHM account Step 2. Under the
There may be comes a time when you need to modify and remove your packages from WHM Account You can do easily if you will follow steps as I am going to explain Step 1. Log into WHM account Step 2. Click on the package icon which is located on home screen Step 3. Here
Once’s you have logged in WHM account and you should follow my instruction step by step:- Step 1. Make sure that you are on the home screen of WHM account and click on the Account Functions link Step 2. Go to the link manage account suspensions and click on it Step 3. Be aware and
The skeleton directory is a one of the main element function in WHM panel, now I am going to explain something more about it. Skeleton directory is that place where reseller hosting is created the index page of all websites. It means reseller hosting put here the home page of all accounts/website. Where you can
Step 1. Log into WHM account Step 2. Under the Accounts Functions click on the Manage Account Suspension link Step 3. You have to select here account that you want to modify Step 4. You can do here the modification to the suspended page directory and click on the link Upload Template to make change
Here I am going to explain process how we can change cPanel theme in WHM account. Step 1. Log into your WHM account Step 2. You have to click here Account functions link which will located on the home screen Step 3. In this step you have to click on the link Modify an account
This is one of the best features of WHM that allow modifying your account, if you want to modify your account password then you should follow my instructions. Step 1. Log into WHM account Step 2. You have to click here account functions icon which is located on the screen Step 3. You will see
WHM (Web Host Manager) is provided to the facility to modify existing account there you can change information as per your requirement and need:- Step 1. Log into WHM account Step 2. Click on the link Modify an account under the account function section Step 3. Here you have to select the name of the
You can change your WHM password within a minute you have to follow these step:- Step 1. log into WHM account Step 2. You have to click on the icon Server Configuration menu which will be located on the home screen Step 3. You have to click on the link Change Root Password which will
Here your customer can park domain names themselves via WHM account Step 1. Log into WHM account Step 2. You have to click here DNS functions icon Step 3. Here you will see option park a domain sub-icon Step 4. Make sure your primary domain and click on it Step 5. Simply enter the new
Here means of the creating package is allow you to specify several setting regarding your hosting plan for your end of customers. Like Addon domain, storage, security, database domain parking etc. Step 1. Log into WHM account Step 2. Now here in the Packages customer, you have to click on the Add a Package option
Step 1. Log into cPanel account Step 2. Click on the Redirects link which will locate under the Domains sections Step 3. Select Redirection type under the Add redirect Step 4. Select the name of the domain and then type the web page that you want to redirect Step 5. Type the destination web page
You can easily create database in your cPanel account by following the below mentioned steps. Step 1. Login cPanel account Step 2. Under the Database section, click on the link MySQL Database Wizard. Step 3. Now enter the Name of the database that you wish to create click on next step button for further steps
Step 1. Log Into cPanel account Step 2. Click on the link Directory Privacy link which will locate in the files sections Step 3. You have to click here on the name of the Directory that you want to protect Step 4. Select the password to protect this directory box under the under the Security
Creating a custom error page in cPanel Step 1. Log into cPanel account Step 2. Under the advanced section, you have to click the “error page” link Step 3. Select your domain name from here (If you have multiple domains in cPanel) Step 4. Here you will see some major common error code click that you
Step 1. Log Into cPanel account Step 2. You have to go domain section and click on the link Subdomain Step 3. Here you have to type the name of the subdomain and select the domain to create under. The default path to creating subdomain folder under public_html folder. Step 4. Finally, click on the
Step 1. Log into your cPanel account Step 2. Under the domain section you have to click on Addon domain link Step 3. Now you will see the new window you have to fill all information regarding Addon Domain Step 4. After completing the details you just have to click on Add Domain button Finally,
You can optimize website using cPanel’s optimization tool within some steps. Step 1. Log Into cPanel account Step 2. Click on the optimize website button under the Software section Step 3. After clicking the optimize website button you will see the new window Here you will see three option to optimize website (User can compress