How to Migrate a WordPress site without cPanel & FTP? [STEP BY STEP]☑️
Here in this documentation we will describe you step by step process to migrate your WordPress site without cPanel and FTP.You can also watch this video with complete steps on how to migrate/transfer your WordPress site without accessing cPanel or FTP.
Follow the steps given below to learn how to migrate WordPress site without cPanel & FTP:
Step::1 Login to your WordPress admin panel

Step::2 Go to Plugins section and click on Add New

Step::3 Search for WP File Manager in the search box

Step::4 Click on Install Now button

Step::5 Then click on Activate button at the same place

Step::6 Now again in the search box type BackWPup plugin

Step::7 Click on Install Now button and then tap on Activate


Step::8 After this go to WP File Manager plugin and click on Download icon

Step::9 In the pop-up dialog box click on Save File and then tap OK

Step::10 Then go to BackWPup Plugin
Step::11 Click on Download database Backup under One click Backup section

Step::12 In the pop-up dialog box that appears click on Save File and then tap OK

This is how you download the whole WordPress files and database into your Local PC.
Now you need to restore these files and database to your cPanel account. Follow the steps to restore WordPress in your new hosting account:
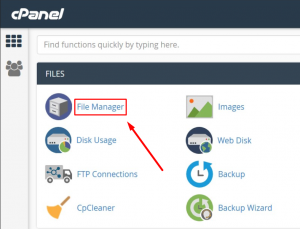
Step::1 Now login to your cPanel and click on File Manager
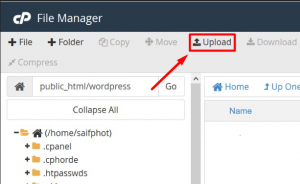
Step::2 Then go to Public_html and upload WordPress zip file which you have downloaded
Step::3 Unzip/Extract the zip file

Step::4 Go to MySQL Database section in your cPanel

Step::5 Create A Database, enter the database name and go to the Next Step.

Step::6 Create Database Users, enter the database user name and password and click Create User.

Step::7 Add User to the Database, click the All Privileges checkbox and click Next Step.


Step::8 Now go to phpMyAdmin under DATABASES section in cPanel

Step::9 Click on the associated Database and then tap on Import icon

Step::10 Then click on Browse button and upload the database file and click on Go button at the bottom


Step::11 After you have successfully uploaded the database file go back to the wordpress installation direction and search for wp-config.php file

Step::12 Edit the wp-config.php file and add the newly created password in DB_PASSWORD line

Step::13 Click on Save Changes and close the editor.

That’s it!!!
Hope this helps!!
For more information, kindly follow us on social media like Twitter and Facebook and for video tutorials, subscribe to our YouTube channel –https://youtube.com/redserverhost.com
Facebook Page- https://facebook.com/redserverhost
Twitter Page- https://twitter.com/redserverhost.com
If you have any query, feel free to let us know via the comments section below.
Thanks for Reading!!!
Tags: cheap linux hosting, buy linux hosting, cheap reseller hosting, buy reseller hosting, best reseller hosting, cheap web hosting, cheapest web hosting, cheapest reseller hosting, cheap reseller host, cheap linux host, cheapest linux hosting, best linux hosting, best web hosting